DevOps觀念中一項很重要的環節就是要有自動化的CI/CD流程,而最常被用來實作CI/CD的tool就是Jenkins,以下說明如何一步步透過Jenkins建立CI/CD流程。
我們將實作分成CI和CD兩個階段,在CI的部分中我們先實作目標為"當有新的source code就觸發自動build code,並紀錄回傳結果"。
實作步驟如下:
1. 將source code上傳至Github
2. 安裝Jenkins
3. 新增工作,設定Jenkins (Github, Nuget, MSBuild)
4. Message inform
5. 設定"當有新的source code就觸發自動build code"
1. 將source code上傳至Github
先申請一個Github帳號,開一個新的project,上傳你的source code (此處以ASP.NET Core MVC開發)
2. 安裝Jenkins
請參考連結:
https://dotblogs.com.tw/stanley14/2018/05/27/Jenkins_install
Jenkins的套件很容易安裝失敗,有時要重安裝幾次才會成功,也可以之後要用到再安裝。所以如果真的安裝不上去就先跳過安裝即可。
3. 新增工作,設定Jenkins (Github, Nuget, MSBuild)
請參考連結:
a. 設定Nuget, MSBuild
https://ithelp.ithome.com.tw/articles/10211030
- 安裝Visual Studio 2017 Enterprise (DevOps)
- MSBuild的設定如下:(設定MSBuild15即可)
路徑:C:\Program Files (x86)\Microsoft Visual Studio\2017\Enterprise\MSBuild\15.0\Bin\MSBuild.exe
- Nuget的執行檔下載後放至"C:\nuget\"下,並加入至環境變數中。設定完成後請瀏覽器執行URL:"(jenkins_url)/restart ",讓Jenkins重新啟動。
b. 設定Git source code control (Github)
https://bryanyu.github.io/2018/01/07/Jenkins04/
c. 新增工作,設定Jenkins (Github, Nuget, MSBuild)
https://bryanyu.github.io/2018/01/07/Jenkins06/
4. Message inform
a. Gmail
https://medium.com/@kuanweilin/%E8%87%AA%E5%8B%95%E5%8C%96%E5%B7%A5%E7%A8%8B%E5%B8%AB%E4%B9%8B%E8%B7%AF-jenkins%E7%9A%84%E8%A8%AD%E5%AE%9A%E8%88%87%E5%AF%A6%E4%BD%9C-9708fe664d08
實測google的gmail會阻擋,需調整gmail安全層級設定。
b. Microsoft Teams
設定訊息通知傳送到Teams頻道上:
https://dotblogs.com.tw/stanley14/2018/08/04/Jenkins_O365_MSTeams
5. 設定"當有新的source code就觸發自動build code"
設定github的webhook:
https://medium.com/faun/triggering-jenkins-build-on-push-using-github-webhooks-52d4361542d4
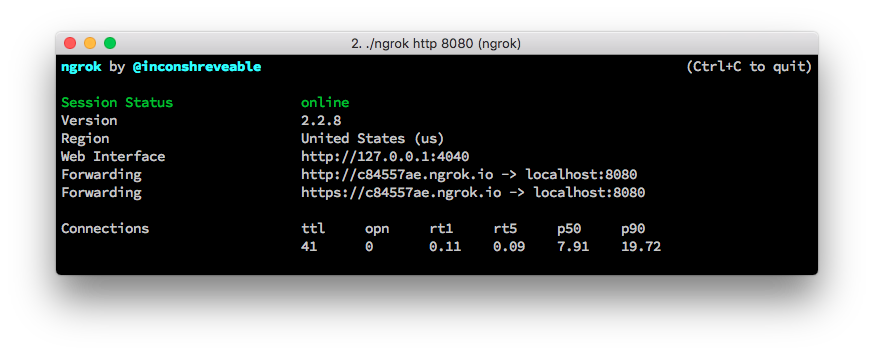
設定webhook時要提供Jenkins的連線網址,可用ngrok產生一個public網址,如下:
由於我們現在是將 Jenkins 運行在本機端,所以 Jenkins URL 是

其中
到此就完成設定,可以上傳source code至github project看看Jenkins是否有執行編譯。
我們將實作分成CI和CD兩個階段,在CI的部分中我們先實作目標為"當有新的source code就觸發自動build code,並紀錄回傳結果"。
實作步驟如下:
1. 將source code上傳至Github
2. 安裝Jenkins
3. 新增工作,設定Jenkins (Github, Nuget, MSBuild)
4. Message inform
5. 設定"當有新的source code就觸發自動build code"
1. 將source code上傳至Github
先申請一個Github帳號,開一個新的project,上傳你的source code (此處以ASP.NET Core MVC開發)
2. 安裝Jenkins
請參考連結:
https://dotblogs.com.tw/stanley14/2018/05/27/Jenkins_install
Jenkins的套件很容易安裝失敗,有時要重安裝幾次才會成功,也可以之後要用到再安裝。所以如果真的安裝不上去就先跳過安裝即可。
3. 新增工作,設定Jenkins (Github, Nuget, MSBuild)
請參考連結:
a. 設定Nuget, MSBuild
https://ithelp.ithome.com.tw/articles/10211030
- 安裝Visual Studio 2017 Enterprise (DevOps)
- MSBuild的設定如下:(設定MSBuild15即可)
路徑:C:\Program Files (x86)\Microsoft Visual Studio\2017\Enterprise\MSBuild\15.0\Bin\MSBuild.exe
- Nuget的執行檔下載後放至"C:\nuget\"下,並加入至環境變數中。設定完成後請瀏覽器執行URL:"(jenkins_url)/restart ",讓Jenkins重新啟動。
b. 設定Git source code control (Github)
https://bryanyu.github.io/2018/01/07/Jenkins04/
c. 新增工作,設定Jenkins (Github, Nuget, MSBuild)
https://bryanyu.github.io/2018/01/07/Jenkins06/
4. Message inform
a. Gmail
https://medium.com/@kuanweilin/%E8%87%AA%E5%8B%95%E5%8C%96%E5%B7%A5%E7%A8%8B%E5%B8%AB%E4%B9%8B%E8%B7%AF-jenkins%E7%9A%84%E8%A8%AD%E5%AE%9A%E8%88%87%E5%AF%A6%E4%BD%9C-9708fe664d08
實測google的gmail會阻擋,需調整gmail安全層級設定。
b. Microsoft Teams
設定訊息通知傳送到Teams頻道上:
https://dotblogs.com.tw/stanley14/2018/08/04/Jenkins_O365_MSTeams
5. 設定"當有新的source code就觸發自動build code"
設定github的webhook:
https://medium.com/faun/triggering-jenkins-build-on-push-using-github-webhooks-52d4361542d4
設定webhook時要提供Jenkins的連線網址,可用ngrok產生一個public網址,如下:
由於我們現在是將 Jenkins 運行在本機端,所以 Jenkins URL 是
http://localhost:8080。然而,GitHub 並不知道誰是 localhost,為了練習,我們可以透過 ngrok 這套簡單的小工具來暫時將 localhost:8080 推送到網路上。ngrok 的使用方式非常簡單,只要將檔案下載下來後,透過 command line 切換到下載目錄,並執行:
$ ./ngrok http 8080
應該就可以看到類似以下畫面: 
其中
http://c84557ae.ngrok.io 就是我們這次將 localhost:8080 推送網路上的網址。到此就完成設定,可以上傳source code至github project看看Jenkins是否有執行編譯。


留言
張貼留言